
CRDC Data access with DCF
Identify the Data of Interest
First, you will need to define your virtual cohort or data of interest from a CRDC repository. You can find a list of active repositories at https://datacommons.cancer.gov/data/access-data, each with their unique user interface and APIs.
Once you have defined your virtual cohort, retrieve the appropriate UUIDs/GUIDs given the tools available from your repository. Some repositories might use the term UUID or, like, the Data Commons Framework, GUID; the difference among CRDC is inconsequential.
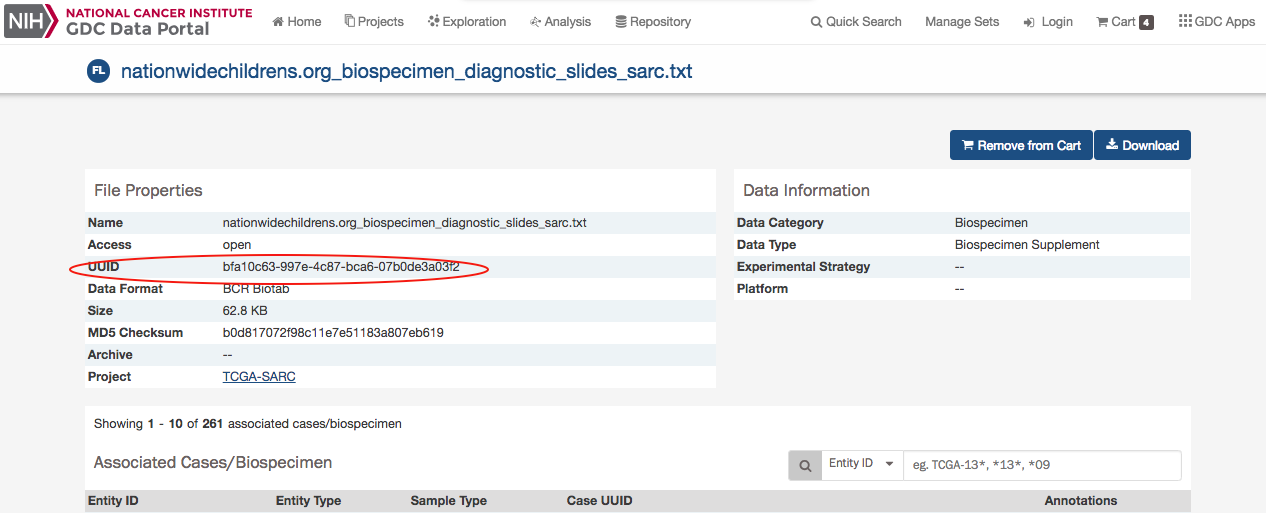
The screenshot below is illustrative of a UUID/GUID listed on a CRDC repository, in this case the Genomic Data Commons. Other repositories may provide UUIDs/GUIDs in different manners. Please contact any repository directly for support in locating the UUIDs/GUIDs or navigating their APIs.
Authenticate If Required
Second, please follow these steps if your data of interest require authentication and authorization:
Login to https://nci-crdc.datacommons.io/ with NIH iTrust
If you want to access data programmatically, you can download an API key. Otherwise, skip this step.

Figure 1: Login to https://nci-crdc.datacommons.io/ with NIH iTrust

Figure 2: If using Python, download your DCF API credentials, otherwise skip this step
Access The Data Using DCF
Finally, you have two choices to access the data. You can use the DCF Services as described in the next two steps.
You can generate a signed URL to download a data object with `https://nci-crdc.datacommons.io/user/data/download/<GUID>`. This will return a JSON document with a signed URL which can be followed to download the file.
This endpoint requires authorization.
If using a browser, you can first ensure you are logged into Gen3 and then follow the above URL.
If accessing programmatically, you will need to use the API Key downloaded previously to generate a temporary access token and send it in your request. In order to simplify this effort for Python, we have a Python package available at https://pypi.org/project/gen3/.
Optionally, you can request a specific storage location to create a signed URL for Amazon Web Services S3 Storage or Google Cloud Platform Storage by providing a protocol query parameter. Not all CRDC data repositories have copies of their data in both Cloud Service Providers (CSPs) listed below.
For Amazon Web Services (AWS) S3 Storage: https://nci-crdc.datacommons.io/user/data/download/<GUID>?protocol=s3
For Google Cloud Platform Cloud (GCP) Storage: https://nci-crdc.datacommons.io/user/data/download/<GUID>?protocol=gs
Access The Data Using A Cloud Resource
Alternatively, you can use one of the three cloud resources to access the data of interest from within their resource.
Access By Linking To DCF
It’s possible for the user to give permission to a third party service to act on their behalf to access data in the DCF. The DCF implements OpenID Connect as the standard method for operating with third party services.
Third party services need to receive client credentials and implement the defined OpenID Connect (OIDC) flow wherein a user will authenticate and consent to the third party service acting on their behalf. The third party service will then receive tokens for interacting with DCF's API.
DCF supports OIDC's Authorization Code Flow and Implicit Code Flow. An example framework for making a web app that implements the Implicit Code Flow against a Gen3 Instance (such as DCF) is available at:
https://github.com/uc-cdis/create-gen3-app
For server side access, OIDC's Authorization Code Flow must be implemented in the third party service (in compliance with the OIDC standard). To implement this flow, a new client must be requested and approved by DCF. This will provide a client ID and a client secret key enabling a third party application to execute this flow. The flow then follows standard OIDC Authorization Code Flow. For reference, the rough steps are as follows:
Redirect to DCF authorization endpoint, example: https://nci-crdc.datacommons.io/user/oauth2/authorize?response_type=code&client_id=<CLIENT_ID>&redirect_uri=<URL_ENCODED_REDIRECT_ENDPOINT_ON_YOUR_END>&scope=openid+user+data
User will login from NIH login, and a DCF consent screen will be displayed for user to agree to share DCF information with your application (see image below).
After that, DCF will redirect to the URL you passed in the initial request, with a short lived ‘code’ in parameter.
Your server should exchange the access_token and refresh_token, id_token with the short lived code and your client_id, client_secret, using the standard OIDC token endpoint(https://nci-crdc.datacommons.io/user/oauth2/token). Please refer to the official OIDC Standard for full details about this flow: https://openid.net/specs/openid-connect-core-1_0.html
You can use the access_token to call DCF APIs to get user information and data access. User information is provided via the OIDC Standard Userinfo endpoint.
You can inspect DCF's OIDC Configuration by the standard ".well-known/openid-configuration" endpoint here: https://nci-crdc.datacommons.io/user/.well-known/openid-configuration. From there you can receive the "userinfo_endpoint" (and lots of other valuable information about DCF's OpenID Configuration).
NOTE: You must send an access_token along with your request to the Userinfo endpoint as a Bearer token.
The refresh_token can be used to refresh access_token or id_token. The refresh_token will be valid for 30 days. After that the user will need to login through DCF again to obtain new tokens.Once the third party application has an access_token for a user, it can be passed in an Authorization header as a Bearer token to API requests to generate a signed URL for a data object in DCF via the https://nci-crdc.datacommons.io/user/data/download/<GUID> endpoint.

Figure 3: User will login from NIH login, and a DCF consent screen will be displayed for user to agree to share DCF information with your client
Access The Data Using AWS Open Data Strides Program
Amazon Web Services (AWS) has joined the National Institutes of Health’s Science and Technology Research Infrastructure for Discovery, Experimentation, and Sustainability (STRIDES) Initiative in October 2018. Several CRDC datasets are hosted in the AWS Public Dataset Program. Rough steps to access the data through AWS are the following:
Find publicly available datasets using the Registry of Open Data. You can browse or search for data of interest. The results contain information about datasets, usage examples, and AWS Resources information, including AWS bucket locations.
You can use AWS bucket locations to access publicly available datasets, analyze and build services on top of them.
Additional information about the AWS Public Dataset Program can be found here.
Additional Information
Please refer to the following Gen3 Tech Talk video providing a brief overview and steps required to obtain access to the data using data NCI DCFS.